PASTA NICOISE

SALAD NICOISE

Serves 3 – 4.

I don’t know if there is a thing in France called Pasta Nicoise, but this is very similar to Salad Nicoise, so that’s what I’m calling it. Based on this recipe at Bon Appetit plus other reader reviews, I made the recipe below which was very easy and quick and perfect for a weeknight.

1/3 cup sundried tomatoes

1 cup green beans, stemmed and cut into bite sized pieces

8 oz. dried short pasta

3 – 4 garlic cloves, minced

zest of one lemon

2 tablespoons fresh lemon juice

1 can tuna in olive oil (wild caught), drained

¼ olive oil

salt

pepper

2 tablespoons capers, drained

2 cups baby greens, chopped

parmesan cheese


Put the sundried tomatoes in a heat-proof bowl and cover with hot water. Let sit for 5 – 10 minutes and then drain. Bring a large pot of water to boil for the pasta.

After zesting the lemon into a small bowl, squeeze the lemon juice into a small bowl and put the garlic in the juice to macerate for 10 – 15 minutes.

In a large heat-proof bowl, combine the drained tuna, olive oil, salt pepper, drained capers and tomatoes, lemon zest, greens and salt and pepper to taste. You can place the bowl over the water to heat up the sauce ingredients a bit or just let sit at room temperature as the pasta boils.

Cook pasta according to directions. When 2 minutes are left in cooking time, add the green beans to blanch them. Stir lemon juice and garlic into sauce. Drain pasta and beans and add to sauce bowl and toss. Garnish with grated parmesan and serve.

Here’s a PASTA NICOISE.

PUMPKIN CHEESECAKE BARS

Pumpkin Cheesecake Bars

This takes the gingersnap crust from another pumpkin pie recipe and a couple different pumpkin cheesecake recipes (mostly this one) to make a treat in the shape of a bar. Although I love pie, I am often frustrated that the crust distribution is so unequal across the slice. And while I love this gingersnap crust, it is a bit crumbly at its exposed edges in a pie. The bar solves these two problems. Plus, this swirled filling is nowhere near as rich as many cheesecake recipes, nor is it as cloyingly custardy as many pumpkin pie recipes. The texture is smooth, creamy and spicy. The overall ginger flavor is quite strong, so you might want to cut down the amount if that worries you. Finally, there are lots of steps and planning ahead, including two rounds with your food processor, but the final product is worth the time and effort, and none of the steps are terribly arduous. A perfect way to spend a fall day when you can be in and out of the kitchen.

Crust:

9 oz. gingersnap cookies

1 cup pecan pieces

¼ cup brown sugar

2 tablespoons chopped crystallized ginger (optional)

¼ cup butter, melted

Filling:

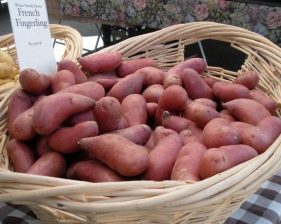
1 6 – 7” sugar pumpkin OR 1 15 oz. can pumpkin puree

¾ cup sugar

¼ cup chopped crystallized ginger

8 oz. cream cheese, room temperature

2 large eggs, room temperature

¼ cup heavy cream

1 tablespoon flour

¼ teaspoon salt

1 teaspoon cinnamon

¼ teaspoon nutmeg

1/8 teaspoon allspice

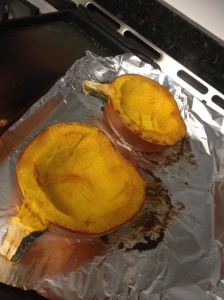
If making your own puree:

Preheat oven to 350 degrees. Line a rimmed baking sheet with foil.

Cut the pumpkin in half vertically (through or right next to stem, or remove stem). Scoop out seeds and stringy stuff. Place pumpkin halves cut side down. Cover with more foil, not tightly, more like a tent.

Bake until tender – until you can pierce the skin and flesh all the way through easily with a fork – about 1 ½ hours. Remove from oven and cool until you can handle it. Scoop out the flesh into a medium bowl. Puree using an immersion blender. Pour off any excess liquid.

Baked Sugar Pumpkin

While the pumpkin is baking, make the crust:

Put cookies into food processor, then process into crumbs. Add pecans, brown sugar and ginger and process until nuts are finely ground. Add melted butter and process to blend. Dump into a Buttered 13 x 9” glass dish and press with spatula to cover bottom evenly. Bake at 350 until set and browned, 10 – 15 minutes, then cool completely.

Gingersnap Crust

Make the filling:

Pulse sugar and ginger in (cleaned) food processor until ginger is well chopped. Add cream cheese and process until smooth. Add eggs, cream, flour and salt and process until combined.

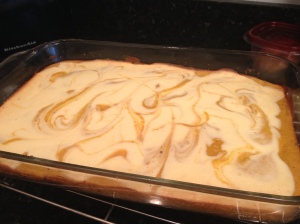
Whisk 1 1/3 cups of the cream cheese mixture (reserving the rest) with the pumpkin puree, cinnamon, nutmeg and allspice. Once the crust is cooled, pour the pumpkin filling over it and spread evenly. Pour the reserved cream cheese mixture on top and then swirl with a spatula. Bake at 350 degrees until center is just set, 35 – 45 minutes. Cool on a rack to room temperature (at least an hour), cover loosely with foil and chill for at least 4 hours. Then reward yourself for the delayed gratification with a nice large piece.

Just Baked Bars

CLICK HERE FOR A PRINTABLE VERSION OF PUMPKIN CHEESECAKE BARS

MARBLE BUNDT CAKE

This is a mash-up of two recipes: one from Martha Stewart, and another from the LA Times version of one from the Buttercake Bakery.  The latter was too sweet for me, and Martha’s was a smaller loaf.  I think this one is just right.

photo

2 2/3 cups flour (I used whole wheat pastry flour and AP)

2 teaspoons baking powder

¾ teaspoon salt

½ teaspoon baking soda

2 cups sugar

1 cup butter, room temp

4 eggs, room temp

2 teaspoons vanilla

1 cup buttermilk

1 cup chocolate chips (optional)

½ cup plus 2 tablespoons unsweetened (good quality) cocoa powder

½ cup plus 2 tablespoons boiling water

powdered sugar, for dusting

Heat oven to 350 degrees.  Butter well and lightly flour a 12-cup bundt pan.

Whisk together the first four ingredients in a medium bowl.  In a stand mixer, cream sugar and butter.  Beat in eggs one at a time, then vanilla.

Mix in flour and buttermilk alternately in a couple batches.  Stir in chocolate chips if using.

In a medium glass or metal bowl, stir together the cocoa powder and hot water until smooth.  Then mix in about 1/3 of the flour mixture.

Pour half of what’s left of the plain batter into the bundt pan.  Pour chocolate mixture on top, and then the rest of the plain batter on top of that.  Gently swirl with a wooden skewer or sharp knife to marble (don’t over do this).

Bake for about an hour, until the cake springs back lightly and tester comes out clean.  Don’t overbake.  Cool completely in pan on a wire rack and then invert onto serving plate.  Dust lightly with powdered sugar and serve.

photo

PRINTABLE VERSION HERE: MARBLE BUNDT CAKE

Fresh Field Pea and Heirloom Tomato Salad

Kids small hands are helpful for shelling peas!

Adapted from a Southern Living (August 2009) recipe.  We are getting fresh, still light green, black-eyed peas at our Farmers’ Market right now (as opposed to the dried ones you’ll get in the autumn).   This was a very satisfying, light summery way to use Southern Field Peas, with lovely textures and little cooking.

These peas have a range of color, the greener the fresher.

Dressing:

In the order below, place ingredients in a jar and shake well.

1 teaspoon lemon zest

¼ cup lemon juice

1 tablespoon honey mustard

1/3 cup chopped fresh basil (plus another few tablespoons for serving)

¾ teaspoon salt

several pinches chili powder

pepper to taste

1/3 cup good olive oil

Salad:

2 cups fresh field peas

4 medium or 6 small heirloom tomatoes

several handfuls of micro greens

4 oz. goat cheese, crumbled

2 slices cooked bacon, crumbled (optional)

Bring a medium pot of water to boil.  Add a generous amount of salt.  Add peas and boil for 8 – 10 minutes, until tender.  Drain and rinse with cold water to stop cooking.  Toss with about 1/3 cup of dressing, to coat.

Cut ¼ inch tomato slices and arrange on salad plates.  Top with a small bunch of micro greens, then a dollop of peas.  Sprinkle goat cheese, bacon (if using), additional basil.  Drizzle with a bit more dressing and serve.

Printable version here:  Fresh Field Pea and Heirloom Tomato Salad

SUPER LOW-STRESS SUMMER SALAD

I adapted this from a “Green Goddess Salad” but I can’t find it now and I didn’t like that name.  This is a loosely measured salad, which means that you don’t need to stress about relative quantities.  But, as I learned the hard way, don’t go crazy with the substitutions (e.g. lime for lemon juice, yuck).

Super, cuz it’s got lots of high quality fats, proteins and vitamins.  It’s also got a great combo of tastes and textures.  To completely avoid cooking on a hot evening, cook the farro in the morning and let it sit in the fridge.  Let it come to room temp before using.

Anchovy Dressing:

2 cloves garlic, minced

½ small shallot, minced

juice from one lemon

2 big squirts Anchovy paste

big pinch of parsley leaves, minced

pinch sugar

1/3 cup olive oil

salt and pepper to taste

Step one:  combine first three ingredients in a jar, shake, let sit for ten minutes.  Step two: add rest of ingredients and shake well.

Salad:

2 handfuls of dinosaur/Tuscan kale leaves, preferably about 6” long

1 big handful of arugula, chopped

1 handful flat leafed parsley leaves, chopped

1 palmful minced mint leaves (or basil, or tarragon)

1 palmful minced chives

1 big handful cooked and shelled edamame

1 small cucumber, diced

2 cups cooked farro*

1 hard boiled egg, diced

½ avocado per person, diced

Make dressing step one.

Stem and chop the kale leaves.  Place in a large mixing bowl.  Spray or drizzle lightly with olive oil and sprinkle with salt.  Massage the kale by gathering it into your fists and gently squeezing and rubbing until it has all darkened in color and begun to soften.  Add the rest of the ingredients except for the avocado and gently fold together (preferably with your hands).  Finish the dressing and drizzle it on sparingly, mixing it in gently and adding more to taste.  Serve with diced avocado on top, as well as additional parsley or a few crumbles of feta cheese or seeds or nuts of choice.

*Cooking Farro:

Combine 1 cup pearled farro with 2 cups water and ½ teaspoon salt.  Bring to a boil and simmer for about 20 minutes, until al dente.  Drain if necessary.  If not using pearled farro, add another ½ cup of water and cook 40 – 50 minutes.

COOKBOOK REVIEW: THE GARDENER & THE GRILL

By Karen Adler and Judith Fertig

I first heard about this book at Shelf Awareness.  My husband is a gardener and a griller – though not usually in tandem.  I’m the one haunting the farmer’s markets and trying to bring more vegetables and less meat to our family dinners.  This book seemed like a great way for our talents and interests to come together, and so far, my guess was correct.

First perusal of the book revealed what I had hoped for:  beautiful photos and simple but inspiring ways to cook fresh seasonal produce on the grill (and some meat and fish as well).  What surprised me was the Pantry section: 45 pages of sauces, salts and butters to make the recipes extra special.

We had our Spring FCA* last night and, inspired by the book, added a “Grill Course” to our menu:  Prosciutto Wrapped Asparagus Spears and Chard Wrapped Goat Cheese on the Grill. And we ended our meal with Warm Honeyed Blackberries with Grilled Pound Cake.  The grilled bits were my favorites of our entire meal.

There are lots of vegetarian recipes here, and we made half the Chard bundles vegetarian by eliminating the prosciutto layer.  (I thought the chard cooked better without this layer personally.)  We also added some pitted cherries to some and Plum preserves to others – both yummy experiments!

It took me a bit to understand the organization of the recipes. The initial Contents page lays out the Chapter headings by course.  Then each chapter has its own contents page, which has bolded headings.  At first I thought these were section dividers, but I realized that the bolded titles are actually specialty pages that have tips for gardening as well as grilling: Growing Edamame, Edible Flowers, Butter Up!, etc.  Other than that, my only complaint was that the Grilled Pound Cake recipe did not include a recipe for the pound cake.  But then when I went looking for one and found similar recipes on epicurious, they ALL had you going to the store to buy the pound cake!  So, I put one together myself and it came out very well, thank you very much 😉

Looking forward to trying lots more of the recipes in this book, including: Planked Butternut Squash, Sage and Brie, Char-Grilled Baby Summer Squash Pizza, Charred Green Beans with Lemon Verbena Pesto, and Grilled Purple Sprouting Broccoli with Garlic Anchovy Dipping Sauce, to name a few.

from Beth Fish ReadsThanks to Beth Fish Reads and her Weekend Cooking meme, which inspired me to write my first cookbook review!  Check out the recipe for Warm Honeyed Blackberries with Grilled Pound Cake to follow.

*FCA stands for Family Cooking Academy.  We gather quarterly with another family that is also interested in eating real food seasonally. We collaborate in the week before on a menu plan, usually looking for some new cooking challenge.

We start the FCA day by going to the farmer’s market with our kids and shopping, then the hostess usually finalizes the menu and cooking plan. 

Then we all cook the meal together, involving the kids as much as they’d like, and sometimes bring in guest families to join us.  I am proud to say that we are starting our 4th year of this tradition and we haven’t missed a quarter yet, despite busy schedules.  We have had some cooking failures, but mostly cooking bliss, and we loved sitting around the table last night remembering yummy things we’d made together.

WARM HONEYED BLACKBERRIES with GRILLED POUND CAKE

Our experience was slightly different from the recipe in the GARDENER & THE GRILL, because one my kids at half of the blackberries before we could use them in the dessert.  We added fresh strawberries to the plate to compensate.  We also cooked the compote on the stove as the kids were helping and have them at the grill seemed too dangerous.  This is the recipe as written; follow the link to my pound cake recipe.  The cinnamon and honey really stand out in this compote and the effect of the grilling on the cake is very pleasing.

Serves 4.

1 cup heavy whipping cream

4 cups blackberries

6 tablespoons honey, divided

juice of ½ lemon

1 teaspoon ground cinnamon, plus more for sprinkling

4 (1 inch) slices of pound cake

Prepare a hot fire in your grill.  Whip the cream with an electric mixer or a whisk until it holds medium peaks, about 5 to 7 minutes.  Set aside.

In a heavy saucepan that can be used on the grill or on a grill side burner, combine the blackberries, 4 tablespoons honey, lemon juice, and cinnamon.

Set the saucepan over the heat and stir to blend, cooking until the mixture begins to bubble.

At the same time, grill the pound cake slices for about 3 to 4 minutes per side until they get good grill marks.

Stir 2 tablespoons of the remaining honey into the whipped cream with a light touch.

To serve, set a slice of grilled pound cake on each plate.  Spoon the warmed berries over the cake and top with the honeyed whipped cream.  Sprinkle with cinnamon and serve.

PRINTABLE VERSION HERE: WARM HONEYED BLACKBERRIES with GRILLED POUND CAKE

POUND CAKE

This is a mash-up of Classic Pound Cake recipe from epicurious and one in The Joy of Cooking.  They both called for cake flour, which I subbed out.  A little laborious, but it makes a lovely dense, moist cake with a hint of citrus.  Not too, too sweet, either.

1 cup whole wheat pastry flour

1 cup AP flour

¼ teaspoon salt

5 eggs, room temperature

2 teaspoons vanilla

1 teaspoon each, lemon and orange zest

½ lb. butter, room temperature

1 cup sugar

Butter a 9” x 5” loaf pan and line the bottom with parchment.  Preheat oven to 325 degrees.

Sift together the flours and salt and set aside.

In a medium bowl, preferably with a pouring lip, whisk together the eggs, vanilla and zests.

In a stand mixer using the paddle attachment, beat the butter until lightened in color and fluffy.  With mixer running on low, gradually add in sugar, then raise speed and beat until very light, about 5 minutes total.  Stop the mixer to scrape down the sides if necessary.  Using the same technique, gradually beat in the egg mixture, dribbling in a tablespoon or so at a time and allowing it to be incorporated until it’s all in and the mixture is smooth.  Beat in the flour mixture in thirds, using a spatula to give the final mix.

Spread the batter into the prepared pan.  Bake for 60 – 75 minutes, or until the cake is well-risen, cracked on top and golden, and tester inserted into the center emerges dry.

Cool cake in pan for a few minutes, then unmold onto a rack and turn over right side up to cool completely.

PRINTABLE VERSION HERE: POUND CAKE

LENTIL VEGETABLE SOUP

This is adapted from Ina Garten’s recipe in “The Barefoot Contessa Cookbook”.  Halved it, simplified it a little, and made it completely vegetarian.  The French green lentils are nice, but I’ve also made it with red or regular green lentils (even in combination, see picture below).  What really makes this quick soup special is the dash of vinegar before serving.  Sounds weird, but don’t skip it!

½ lb. French green lentils

this was a double batch

3 tablespoons olive oil

2 cups diced yellow onions

1 ½ cups diced carrots (3 – 4 carrots)

1 ½ cups diced celery (3 – 4 stalks)

1 teaspoon dried bouquet garni, or thyme

1 teaspoon salt

½ teaspoon freshly ground pepper

½ teaspoon cumin

3 – 4 cloves garlic, minced

1 quart vegetable stock

15-oz. can diced tomatoes with juice

1 bay leaf

red wine vinegar and parmesan cheese for serving

After picking them over for stones, etc., place lentils in a large metal bowl, cover with boiling water and let stand 15 minutes.  Drain.

In a large stockpot or dutch oven, sauté onions carrots, celery with spices, salt and pepper with olive oil over medium heat, until onions are translucent and soft, 15 – 20 minutes.  Add garlic and sauté for another minute.

Add stock, tomatoes, bay leaf and drained lentils.  You might also want to fill the (unrinsed) tomato can with water and add that.  Bring to a boil, then reduce heat and simmer for about one hour, until lentils and vegetables are cooked through.  Add salt and pepper as needed.  Serve hot, with a dash of vinegar and a sprinkled of grated parmesan on top.

Printable version here:  LENTIL VEGETABLE SOUP

SPINACH & MUSHROOM QUICHE

Will not last long.

This is a simple and satisfying recipe that comes together pretty easily, adapted heavily from a Bon Appetit June 1991 recipe.  Totally do-able for weeknight cooking.  I used a combo of Crimini and baby Shitake mushrooms, but your favorite mushrooms will do.  You can also sub a yellow or red onion for the shallots, other cheeses like Monterey Jack, cheddar or fontina and cottage cheese or plain greek yogurt for the sour cream.  This goes well with the WHOLE WHEAT PIE CRUST (SAVORY) recipe.  This just fits into a regular 9” crust, or easily into a deep dish crust.

1 tablespoon butter

1 tablespoon olive oil

½ cup finely chopped shallots

2 tablespoons minced garlic

8 – 12 oz. mushrooms, sliced

splash dry white wine

6 oz. fresh baby spinach, roughly chopped

salt

dough for one 9” pie crust

1 ½ cup grated Gruyere cheese

4 eggs

½ cup sour cream

½ teaspoon salt

¼ teaspoon pepper

1/8 teaspoon nutmeg

1/8 teaspoon dried basil

Heat butter and oil in a large saucepan over medium heat.  Saute shallots until softened, about 5 minutes.  Add garlic and sauté for one minute.  Add mushrooms and sauté until they begin to release their juices.  Add splash of wine, raise heat, and sauté until juices are almost evaporated.  Add spinach in handfuls, with a few pinches of salt and sauté just until wilted.  Remove from heat and allow to cool.

Roll out dough to fit your pie pan and fit into it.  Preheat oven to 375 degrees.

Beat eggs, then beat in sour cream and spices.  Put half the cheese on the bottom of the pie crust, then layer in vegetable mixture, then other half of cheese.  Pour egg mixture over top.  Bake about 50 minutes until filling is set.  Cool slightly and serve.

Printable version here:  SPINACH AND MUSHROOM QUICHE

Morgan likes it.